
"Earlier versions of Outlook Express may not have all the capabilities listed below!"
| Home | | Services | | Gallery | | Tutorials | | Games | | Huggy Zone | | Comments | |
|
Flashcard #22: Applying stationery and inserting pictures into your e-mail message! |
|
|
Susie Tutor says:
"Earlier versions of Outlook Express may not have all the capabilities listed below!" |
Applying Stationery* to Your Message Before You Start Your Message: Click on the word, Message, on the menu bar. Point to New Message Using and then chose a stationery from the pop out selection.
*Note: Stationery is defined as a template that can include a background image, unique text font colors, and custom margins. |
Applying Stationery to Your Message After You Start Your Message: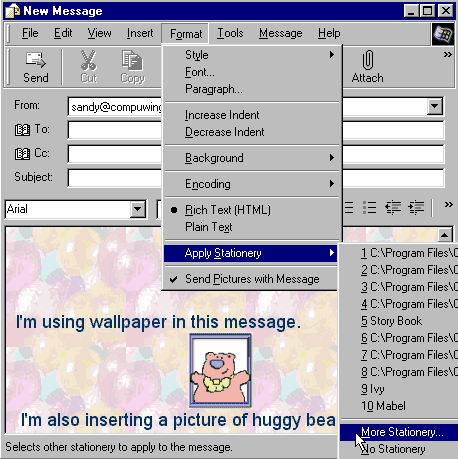 Click on the word, Format, on the menu bar. Point to Apply Stationery.
Select a stationery.
Click on the word, Format, on the menu bar. Point to Apply Stationery.
Select a stationery. |
|
Applying Stationery To All Of Your Outgoing Messages: Click the word, Tools, on the menu toolbar. Click the word, Options, and then click the Compose tab. In the Stationery area, select the Mail check box, and then click Select. |
|
Putting a Picture In Your Message: In the later versions of Outlook Express, you can put a picture in your message. Click your mouse cursor in the place where you want the image to appear in your message. Click on the word, Insert, on the menu bar. Click on the word, Picture, and then click Browse to find the image file in your computer filing sysem. Click on the picture file. Click on Open. Click OK. NOTE: If you are using a later version of Outlook Express and still cannot find the Picture command on your Insert menu, make sure your HTML formatting is turned on! Look at the picture above. Notice that on the Format menu, Rich Text (HTML) has a black dot next to it. Make sure that you have Rich Text selected on your Format menu too. |
| Back to Flashcard Set #2 Contents | Forward to Card 23 |